What is reCAPTCHA and How to Use it?
What is reCAPTCHA?
reCAPTCHA is a CAPTCHA service provided by Google. It is currently used by over 6 million active websites so, if you go anywhere on the Internet, you’ve probably interacted with reCAPTCHA whether you knew it or not. You’re likely to recognize the “I’m not a robot” checkbox or the common challenges like “find all of the of the traffic lights”.
The main purpose of it is to prevent spam submissions from being added to forms. Although it’s commonly known as a free service, there is actually a rate limit of 1,000 calls/second or 1,000,000 calls per month for their free tier (although you’re unlikely to hit that for most small sites).
How exactly does it work?
There are currently two supported version of reCAPTCHA - v2 and v3.
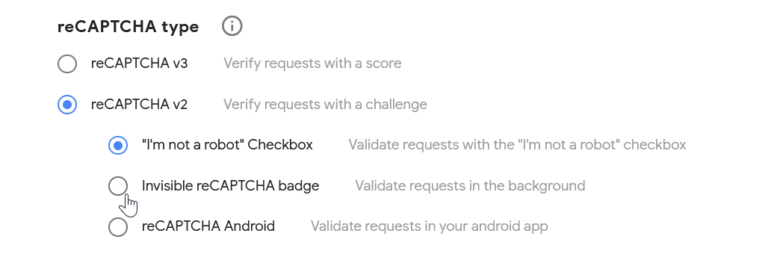
v2 is the version you’re more likely to be aware of. There are actually two different types of CAPTCHA’s in this version: “I’m not a robot” checkbox and “Invisible”. The difference is with the “I’m not a robot” checkbox, the user has to click the checkbox in order for Google to trigger verification whereas, in the “Invisible” one, this happens in the background. In both, if the user is suspected of being a bot, a challenge will be presented; for example, “Choose all the images containing a traffic light.” Unfortunately, this is becoming less and less effective due to the rising development of techniques to circumvent these challenges by malicious actors.
The reduced efficacy on top of the friction it introduces to user interactions has led to Google creating v3. v3 is included on every page, not just pages where a form actually exists, and allows Google to get an overview of the user’s interaction with your site. Based on those interactions, it gives the user a score between 0 and 1 correlating to how sure it is that the user is a human. That score is what’s provided to your application and allows you to make a determination of how to handle the request.
If you want to see the different versions in action, you can check them out here.
TLDR
v2 (“I’m not a robot” Checkbox)
- Only included on page that contains the form
- Challenge-based (e.g. “Pick all of the images containing traffic-lights”)
- Requires explicit user action
- Binary result - bot or human
- Prevents user from submitting the form if it believes they’re a bot
v2 (“Invisible”)
- Only included on page that contains the form
- Challenge-based (e.g. “Pick all of the images containing traffic-lights”)
- Requires explicit user action IF a challenge is to be presented
- Binary result - bot or human
- Prevents user from submitting the form if it believes they’re a bot
v3
- Included on every page
- Behavior based (i.e. “how does the user interact with the website?”)
- No explicit user action required
- Analog result - range of 0 through 1
- Allows user to submit the form even if it believes they’re a bot - your application determines what to do with it
How do you use it?
Registering
1 - Go to the reCAPTCHA registration page
Link: https://www.google.com/recaptcha/admin/create
2 - Fill in the label

3 - Choose which version of reCAPTCHA you want
See TLDR above for comparison

4 - Enter the domain you want to use the captcha on
Note: Domains listed will implicitly include any subdomain

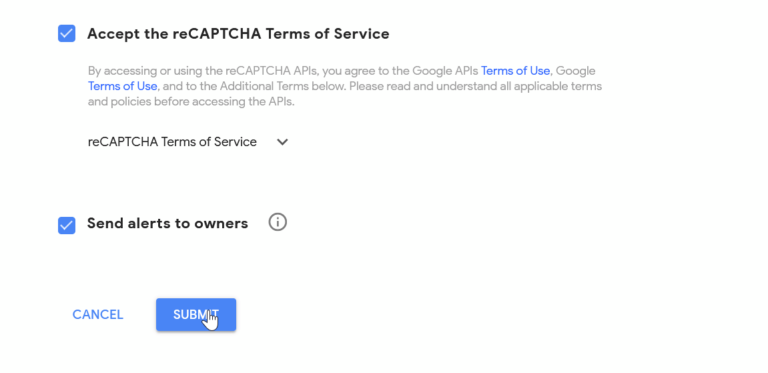
5 - Accept Terms of Service and Click “Submit”

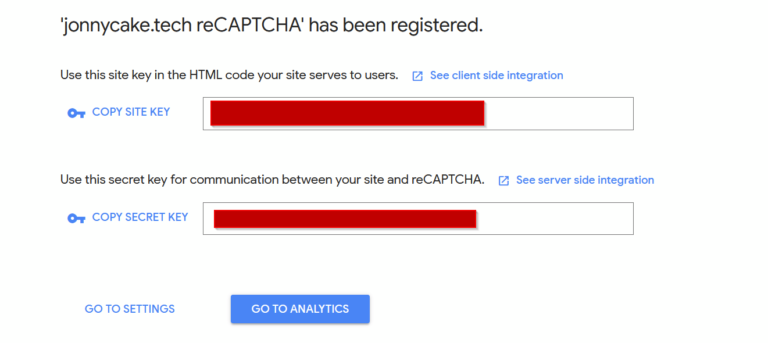
6 - Copy out the site key and secret key (these will be used later)

Including on the Page
HTML (v2)
“I’m not a robot” Checkbox
<!-- Include this JavaScript file on the page the form is on -->
<script src="https://www.google.com/recaptcha/api.js" async defer></script>

<!-- Place this div **inside of the form** the CAPTCHA should apply to -->
<div class="g-recaptcha" data-sitekey="your_site_key"></div>
Other options for rendering the CAPTCHA widget and additional attributes that may be applied to the div can be found in the official documentation.
“Invisible”
<!-- Include this JavaScript file on the page the form is on -->
<script src="https://www.google.com/recaptcha/api.js" async defer></script>

<!-- Create a callback to handle form submission -->
<script>
function onSubmit(token) {
  document.getElementById("demo-form").submit();
}
</script>

<!-- Update the submit button to be a <button> with necessary attributes -->
<button class="g-recaptcha" data-sitekey="your_site_key" data-callback='onSubmit'>Submit</button>
Other options for triggering verification as well as additional attributes that may be applied to the g-recaptcha tag can be found in the official documentation.
HTML (v3)
Implementing reCAPTCHA v3 is similar to the “Invisible” version in v2
<!-- Include this JavaScript file on **all** pages (so Google can better profile the user) -->
<script src="https://www.google.com/recaptcha/api.js?render=RECAPTCHA_SITE_KEY"></script>

<!-- Create a callback to handle form submission -->
<script>
function onSubmit(token) {
  document.getElementById("demo-form").submit();
}
</script>

<!-- Update the submit button to be a <button> with necessary attributes -->
<button class="g-recaptcha" data-sitekey="your_site_key" data-callback="onSubmit" data-action="submit">Submit</button>

<!-- You can also trigger the check via JavaScript with the following code -->
<script>
/** For this to get called, you need to add onlload=checkRecaptcha as a get parameter in the api.js include **/
function checkRecaptcha() {
    grecaptcha.ready(function() {
        grecaptcha.execute('RECAPTCHA_SITE_KEY', {action: 'submit'}).then(function(token) {
            // do whatever
        });
    });
}
</script>
For other options for triggering verification as well as more details on how it works and improving Google’s user profiling, please check the official documentation.
Calling the Google API
After the user submits the form and before you process it, you’ll make the call to the Google API using your preferred request library, by sending a POST request to https://www.google.com/recaptcha/api/siteverify with the following parameters:
| POST Parameter | Description |
|---|---|
| secret | Required The secret key that Google assigned when you registered above |
| response | Required The response token that was returned from the reCAPTCHA API during the verification process |
| remoteip | Optional The user’s IP address |
Source: https://developers.google.com/recaptcha/docs/verify#api_request
Verifying the Response
v2 and v3 return slightly different payloads, but they are very similar.
Return (v2)
Copied from Official Documentation
{
  "success": true|false,
  "challenge_ts": timestamp,  // timestamp of the challenge load (ISO format yyyy-MM-dd'T'HH:mm:ssZZ)
  "hostname": string,         // the hostname of the site where the reCAPTCHA was solved
  "error-codes": [...]        // optional
}
Return (v3)
Copied from Official Documentation
{
  "success": true|false,      // whether this request was a valid reCAPTCHA token for your site
  "score": number             // the score for this request (0.0 - 1.0)
  "action": string            // the action name for this request (important to verify)
  "challenge_ts": timestamp,  // timestamp of the challenge load (ISO format yyyy-MM-dd'T'HH:mm:ssZZ)
  "hostname": string,         // the hostname of the site where the reCAPTCHA was solved
  "error-codes": [...]        // optional
}
Summary
- reCAPTCHA is a CAPTCHA service provided by Google used by a large portion of the Internet
- There are 3 main types in use
- v2 (Checkbox)
- v2 (Invisible)
- v3
- It is free for up to 1,000 requests per second or 1,000,000 requests per month
- v3 gives you more control over what you do with requests that may originate from bots, but requires additional efforts to get right
- A demo of different version is available here
Closing Thoughts
Neither version is totally fool-proof, but having either is an easy way to limit spam submissions. The ease of integration (at least with v2) makes it so there’s really no excuse for not protecting your forms. If you really want to stop spam, though, using a multi-pronged approach of including CAPTCHA as well as performing content-based detection is often the best course of action and should dramatically reduce the amount of spam that gets through.